Writing a Personal Website in Flutter Web

Introduction
This is a technical write-up on my experience writing a website using Flutter Web. I will provide the motivation on why I decided on this technology rather than a more conventional approach. It will include code snippets on how I implemented the main features of the app and the reasoning behind my decisions. The code is not open source yet but I do plan to release it to the public.
I am hoping for this post to be educational to the readers, however, I am aware that I didn't do everything in the best possible way. And it wasn't the point too, I just wanted to write it in a way that will get the job done.
I have a decade of mobile experience which I tried to apply to a website and I am hoping that you might find that interesting. That is the main point of this article. And I think the best way to grow is when you are put slightly out of your comfort zone, so let's do it!
You can see the website here.
Motivation
After getting laid off in October 2023, and the state of IT being the way that it is, I realized that I didn't have a strong online presence outside of, perhaps, LinkedIn. It’s almost embarrassing to say that after such a long time working as a professional developer, there are just a handful of apps that are alive in production, which I am able to showcase.
It’s a sad reality that most projects you spend months or years working on never see the light of day due to changing priorities or simply money problems. This is a problem that I am trying to address by working on my showcase projects such as this website.
The website I built also ties up with the way I see how software gets built. The thing that you first see when starting a new project is a blank screen, there is nothing there, it’s an empty canvas that will be filled with your hard work.
This was the main inspiration, let’s create a literal canvas and fill it up with items that will showcase me as a developer, also adding bits and pieces that I find interesting and fun to spice up the experience.
Approach
I’ll provide the implementation details of what I think are the most interesting parts of the app. There are plenty of Flutter tutorials for building apps in a standard way, with classical UI/UX so I won’t go into detail about things that can be found in standard tutorials.
The main requirement is that I knew I wanted to draw pixels on the screen so the obvious solution was to use the Painter class which lets me do just that. I will use it to draw the background of the whole app.
There are plenty of standard Flutter widgets that are then placed on the canvas. I needed a way to interact with the canvas so luckily there was already a way to do it using the InteractiveViewer class which does just that.
Implementation
Background Effect
One of the first things I wanted to get done is to have a canvas with a background color upon which other widgets will be placed. Which will look like this:
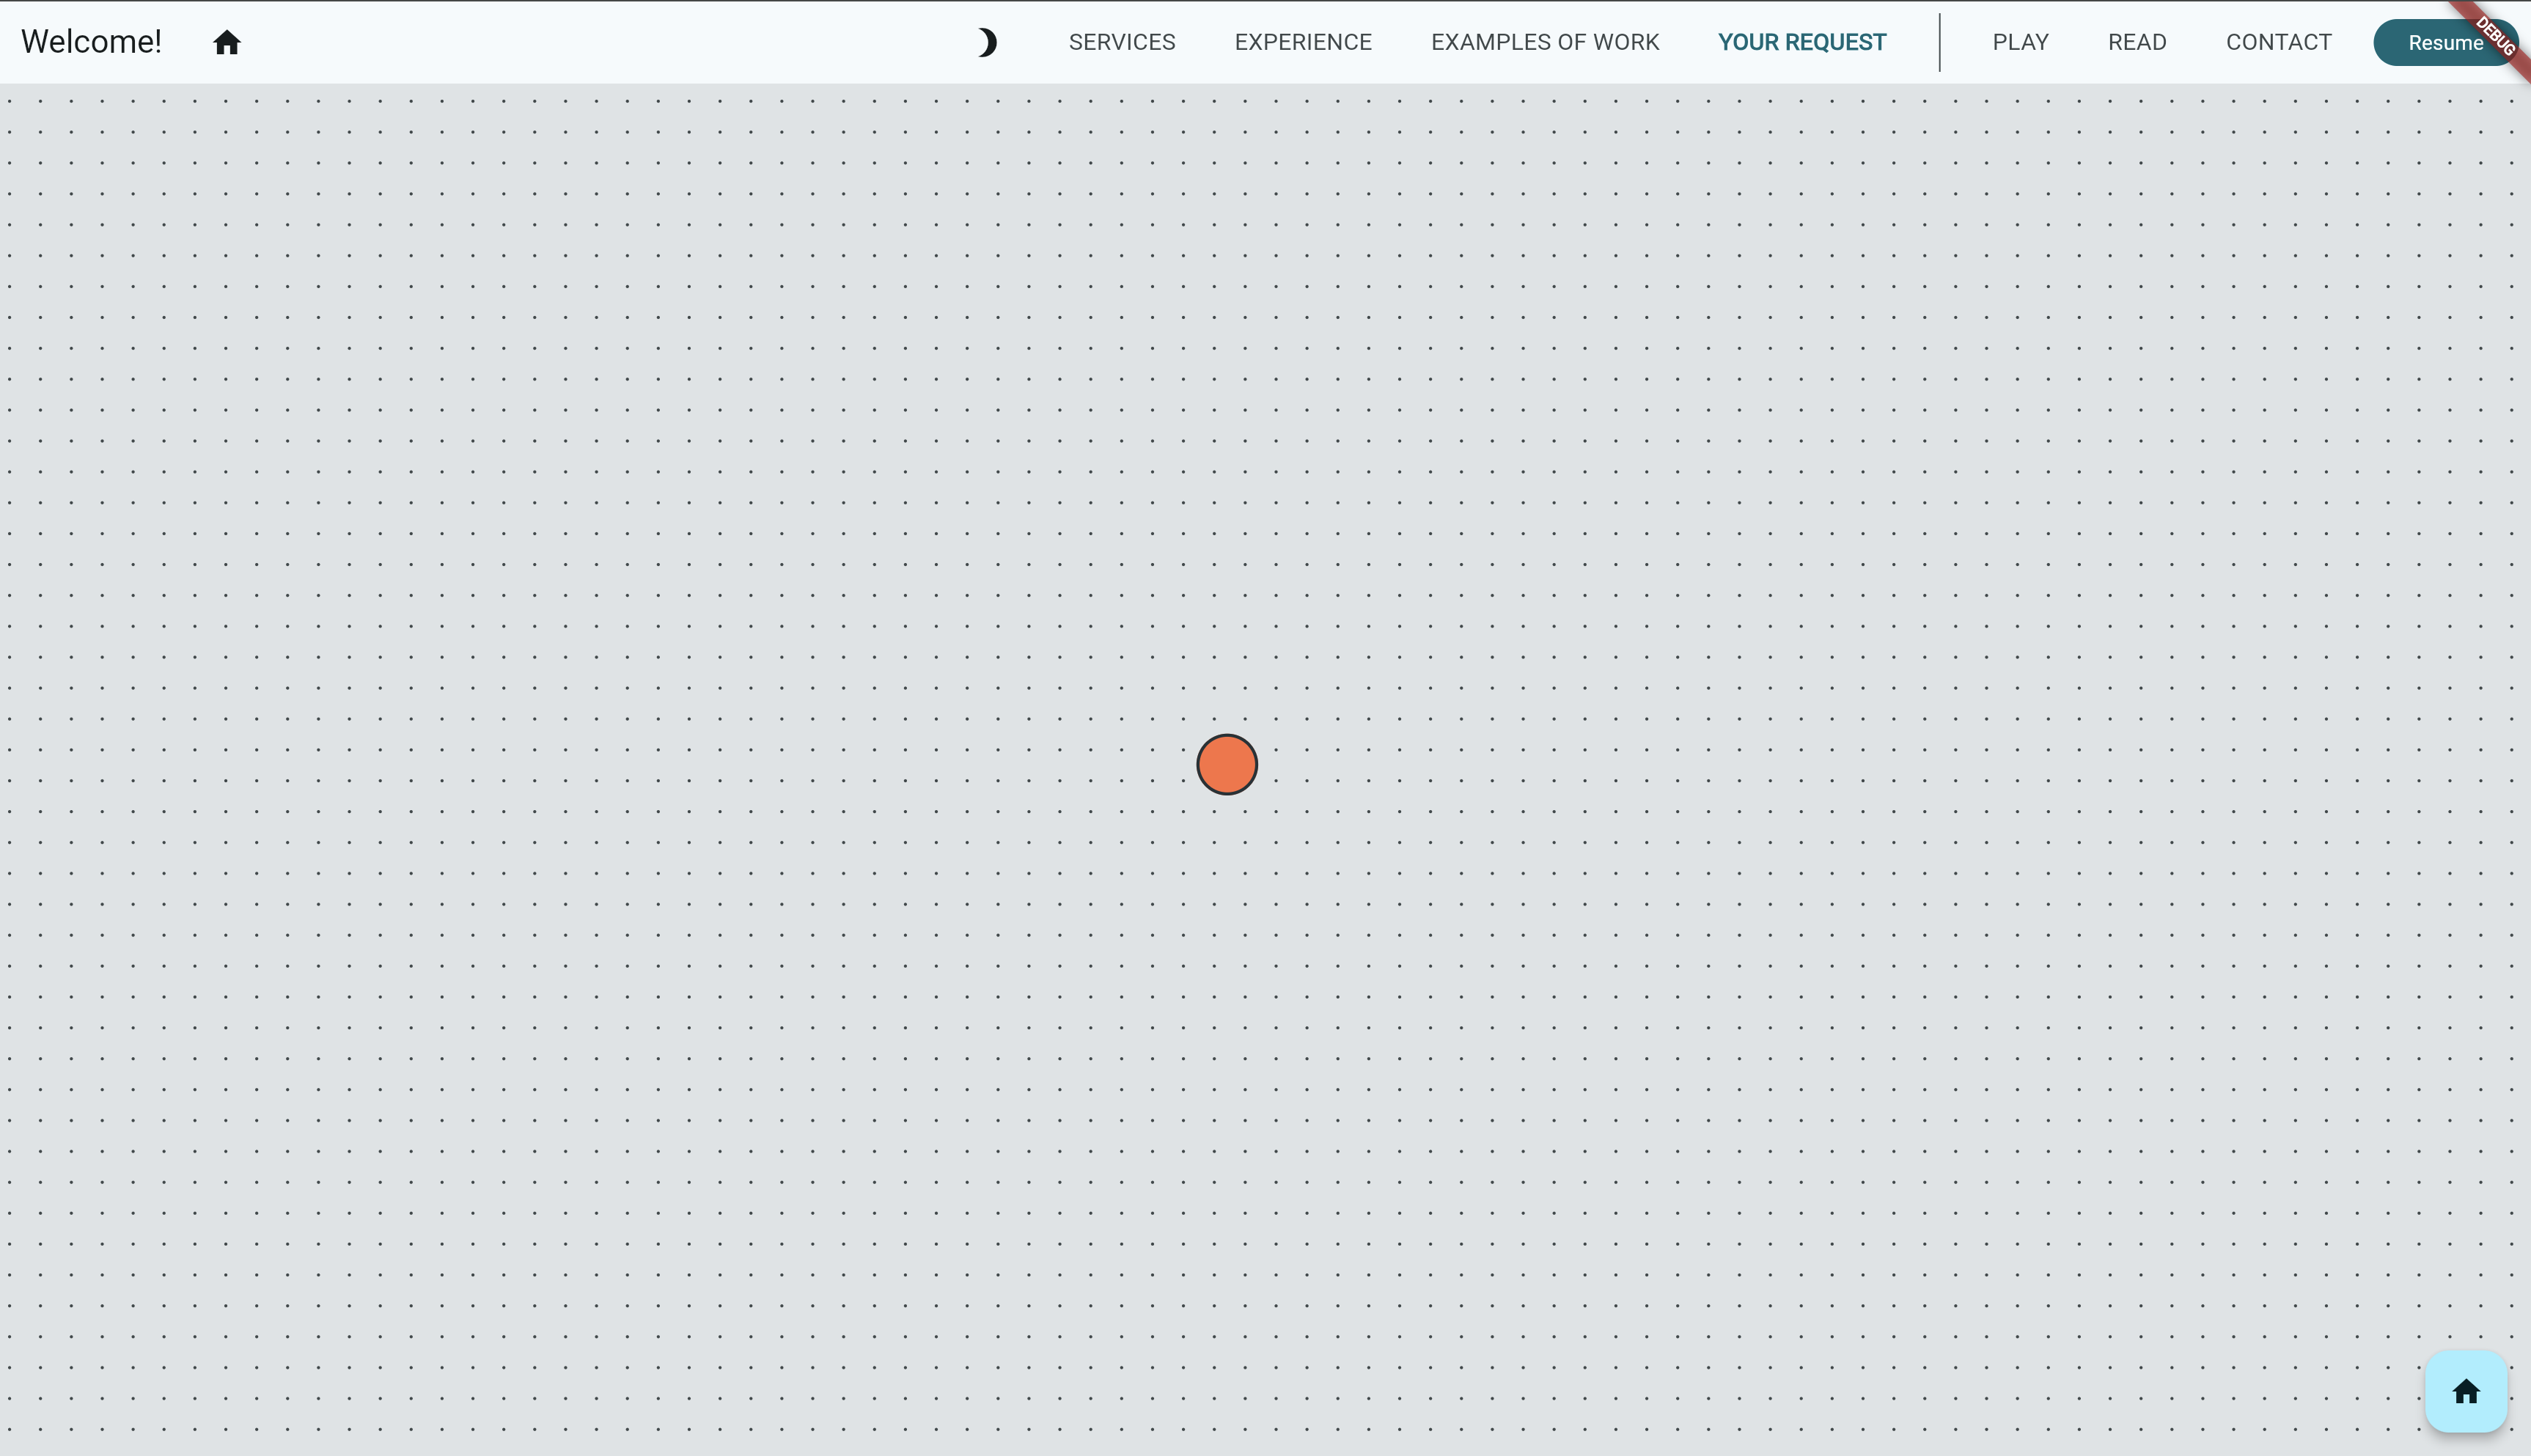
The orange dot represents the custom cursor which I will get to shortly. I wanted the material effect as I think it looks nice, and the support for it is pretty good in Flutter.
The whole screen is wrapped in a Scaffold widget which provides the nice menu section above. Building the menu is not something I will explore here as it’s the standard AppBar widget with clickable elements that fit into the Scaffold.
The body of the scaffold will be a simple Stack container upon which we will place our content. The implementation of the content is explained in the implementing content section below.
It’s easy enough to paint the background using a custom painter, and calling this in the painter:
@override
void paint(Canvas canvas, Size size) {
  if (backgroundColor != null) {
    final rect = Rect.fromLTWH(0, 0, size.width, size.height);
    canvas.drawRect(rect, _backgroundPaint);
  }

  _drawDots(canvas, size);
}
However, painting the dots is what I ended up spending a lot of time doing, mostly because of performance reasons. However, the logic of drawing them is mostly straightforward:
for (var i = initialX; i < endX; i += step) {
  for (var j = initialY; j < endY; j += step) {
    final dx = i.toDouble();
    final dy = j.toDouble();

    canvas.drawCircle(Offset(dx, dy), radius.toDouble(), _paint);
  }
}
To draw the dots, I go from the top left corner to the bottom right corner of the screen, and after every step value, I draw a circle. That’s it.
However, it turns out that calling canvas.drawCircle(…) can be pretty slow if you are not on a high-end device, and when you are drawing hundreds of small circles/dots.
Therefore, I had to do several optimizations which resulted in a kind-of smooth experience. Performance issues are, however, still noticeable when you are on a lower-end device.
Optimizing the background effect
To make the background effect work on most devices I decided to simply reduce the number of dots depending on the zoom level. This would create the desired effect, or at least it will be 90% there on certain zoom levels. I decided that would be good enough while I explore other ways to optimize it.
It resulted in the following effect when zooming in and out:

The separation of zoom levels is not perfect but it gets the job done. This is the logic that drives it, the values are determined by experimentation:
if (zoomLevel < 0.9 && zoomLevel > 0.5) {
  step = this.step * 6;
  radius = this.radius * 2;
} else if (zoomLevel <= 0.5 && zoomLevel > 0.1) {
  step = this.step * 10;
  radius = this.radius * 4;
} else if (zoomLevel <= 0.1) {
  step = this.step * 24;
  radius = this.radius * 6;
}
To optimize it further, I am looking into drawing vertices directly which should result in a much faster draw call. This is done by the drawVertices method which takes in a list of vertices to draw. It’s faster because it makes you responsible for preparing all the vertex data in advance so the GPU can process it all simultaneously, instead of sending one circle position at a time.
By drawing vertices using the above method you are actually drawing triangles, so to make them circles I would have to draw them all from the same point on the canvas in a circular fashion. This technique is explained in this video.
However, due to time constraints, this optimization of drawing background dots is still in progress and will be a topic of discussion in the future.
If you want to know more about drawing vertices directly, I highly encourage you to watch this video which does an amazing job explaining the different ways to draw things on the canvas.
Implementing the custom cursor
Why am I building a custom cursor, you say? Well… there is nothing really wrong with it, but the standard everyday cursors that you see on 99% of websites feels boring and I wanted to spice it up. Therefore, I felt like adding a custom cursor would slightly improve the experience and smoothness of navigating the canvas.
By navigating the canvas, this is what I mean:

You can almost feel like you are touching the canvas and sliding it across the screen. That's exactly the effect I was going for. It's one of those things that's not necessary but I still wanted to add it.
So how is it done? It is actually difficult to customize the cursor that browsers display, so instead, we have to hide it and replace it with a custom widget.
To work with cursors, we can use the MouseRegion widget and hide it by setting the cursor parameter to SystemMouseCursors.none:
return MouseRegion(
  cursor: SystemMouseCursors.none,
  onHover: (event) {
    setState(() {
      pointer = event.localPosition;
    });
  },
  child: Listener(
    onPointerDown: (event) {
      setState(() {
        isClicked = true;
      });
    },
    onPointerUp: (event) {
      setState(() {
        isClicked = false;
      });
    },
    child: SizedBox(
      width: Config.pageWidth,
      height: Config.pageHeight,
      child: Stack(
        children: stackedWidgets,
      ),
    ),
  ),
);
The mouse region wraps the entire screen, which is just a Stack widget. The trick is to use the mouse region to listen for the actual pointer location, and when it's provided, set the orange circle widget at that location.
We also keep track if the pointer is down or up so that the orange circle widget can animate itself properly. The animations are done using the AnimatedPosition and the AnimatedContainer widgets.
This is what is actually happening with the cursor visible:

The AnimatedPosition is used to animate the cursor to your pointer location in a smooth way, so you can notice it moving almost instantly to your mouse:
AnimatedPositioned(
duration: const Duration(milliseconds: 40),
top: centerOffsetY,
left: centerOffsetX,
child: CustomCursorWidget(isClicked: isClicked))
On the other hand, the AnimatedContainer is used to create the click effect with its size changing depending on the click state. The corresponding code of the orange circle widget:
class CustomCursorWidget extends StatelessWidget {
  final bool isClicked;
  final bool shouldHide;

  const CustomCursorWidget({
    super.key,
    required this.isClicked,
    required this.shouldHide,
  });

  final duration = const Duration(milliseconds: 50);

  @override
  Widget build(BuildContext context) {
    var size = Config.cursorSize;
    var actualDuration = duration;

    if (shouldHide) {
      size = 0;
      actualDuration = const Duration(milliseconds: 200);
    } else if (isClicked) {
      size = Config.smallCursorSize;
    }

    return NoHitboxWidget(
      child: AnimatedContainer(
        duration: actualDuration,
        height: size,
        width: size,
        decoration: BoxDecoration(
          color: Colors.accents.last,
          borderRadius: BorderRadius.circular(20),
          border: Border.all(
            color: Colors.blueGrey.shade900,
            width: 2,
          ),
        ),
      ),
    );
  }
}
You may have noticed the NoHitboxWidget widget that is wrapping the container code. Because we are positioning the orange circle on the exact location of our pointer it will make our pointer always click on the orange circle widget, instead of the widgets underneath. This is obviously a problem if we are to have anything clickable on the website.
This is where the NoHitboxWidget comes in. It makes our orange container a non-clickable widget by implementing a custom RenderObject object. RenderObjects are a special kind of objects that are directly used for rendering and hitbox testing. This is the implementation of our NoHitboxWidget:
class NoHitboxWidget extends SingleChildRenderObjectWidget {
  final Widget child;

  NoHitboxWidget({required this.child});

  @override
  RenderObject createRenderObject(BuildContext context) {
    return _SmallerHitBoxRenderObject();
  }
}

class _SmallerHitBoxRenderObject extends RenderProxyBox {
  @override
  bool hitTest(BoxHitTestResult result, {required Offset position}) {
    return false;
  }
}
The only thing it does is make the overridden hit test method always return false. This makes our orange circle not respond to click events and solves our problem.
The custom cursor implementation is a bit more involved than I expected it to be and there are a few more details that I haven't covered but overall I am happy with the result. With the cursor implementation done, let's dive into building and displaying some content for the canvas.
Implementing content for the website
As mentioned in the introduction, the body of the website is just a Stack widget on top of which other widgets will be placed. I've given it a width and height of 10000 to have room for content.
The first element that is added to the stack is the background with dots, as explained earlier. After the background is added, every other widget is placed using the Positioned widget which, as the name implies, positions widgets on the stack, here's an example of two widget cards in a long list of widgets:
...
Positioned(
    top: Config.skillsOffset.dy,
    left: Config.skillsOffset.dx,
    child: const SkillsWidget()),
Positioned(
    top: Config.servicesOffset.dy,
    left: Config.servicesOffset.dx,
    child: const ServicesWidget()),
...
And this is what they correspond to:
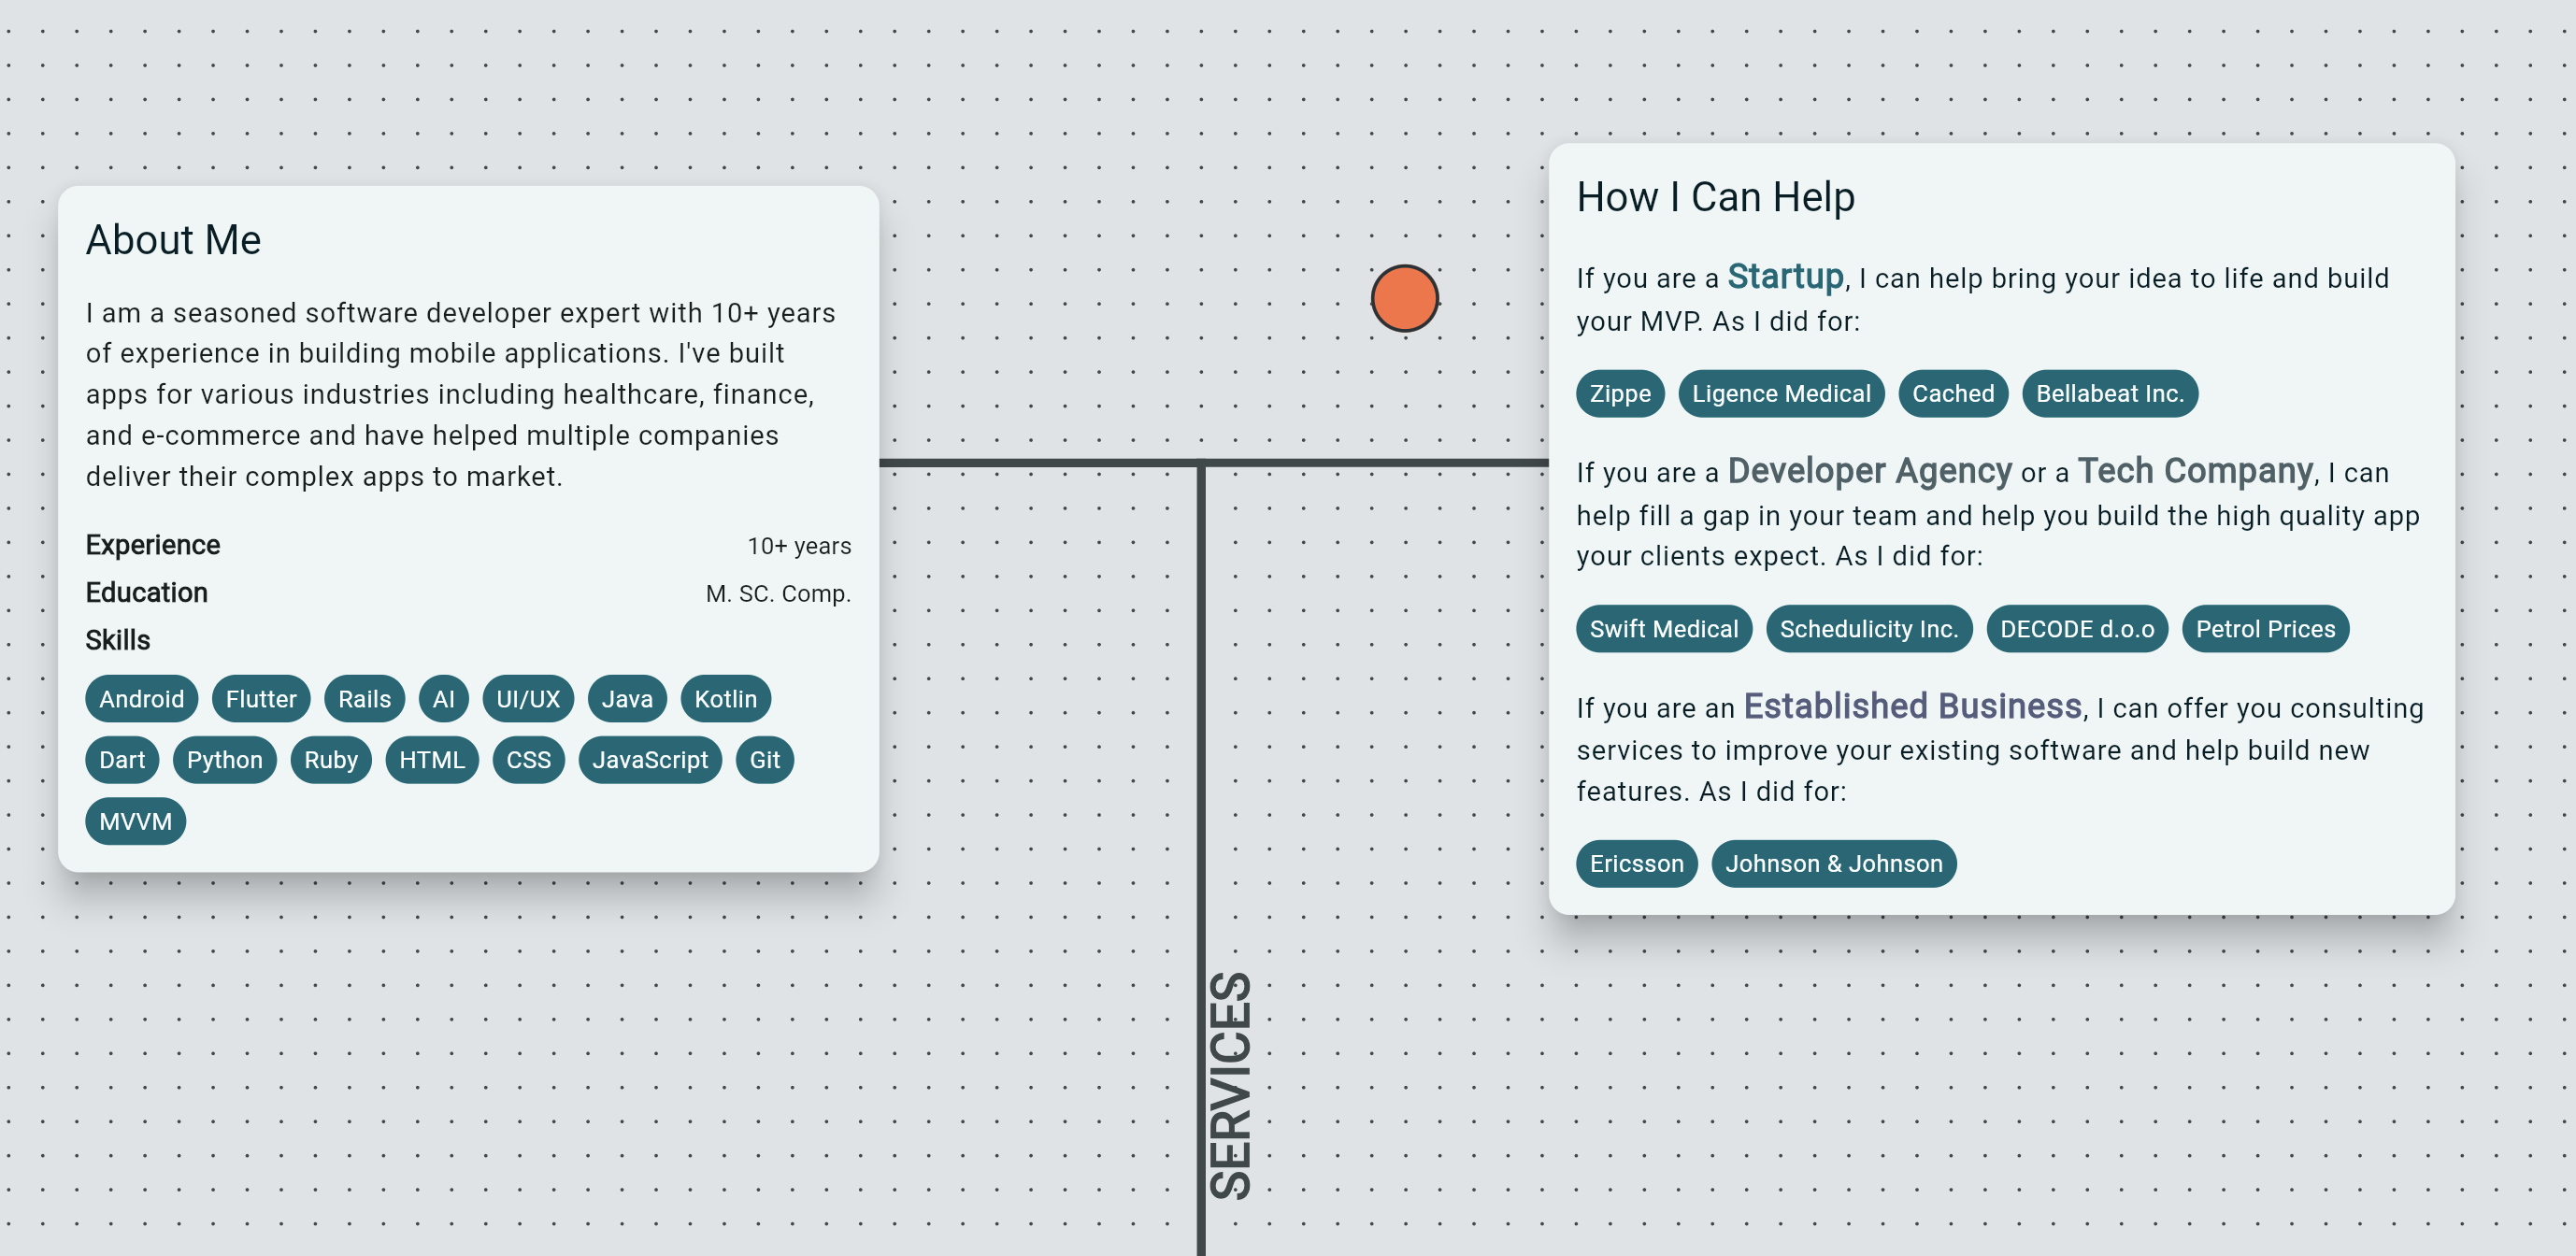
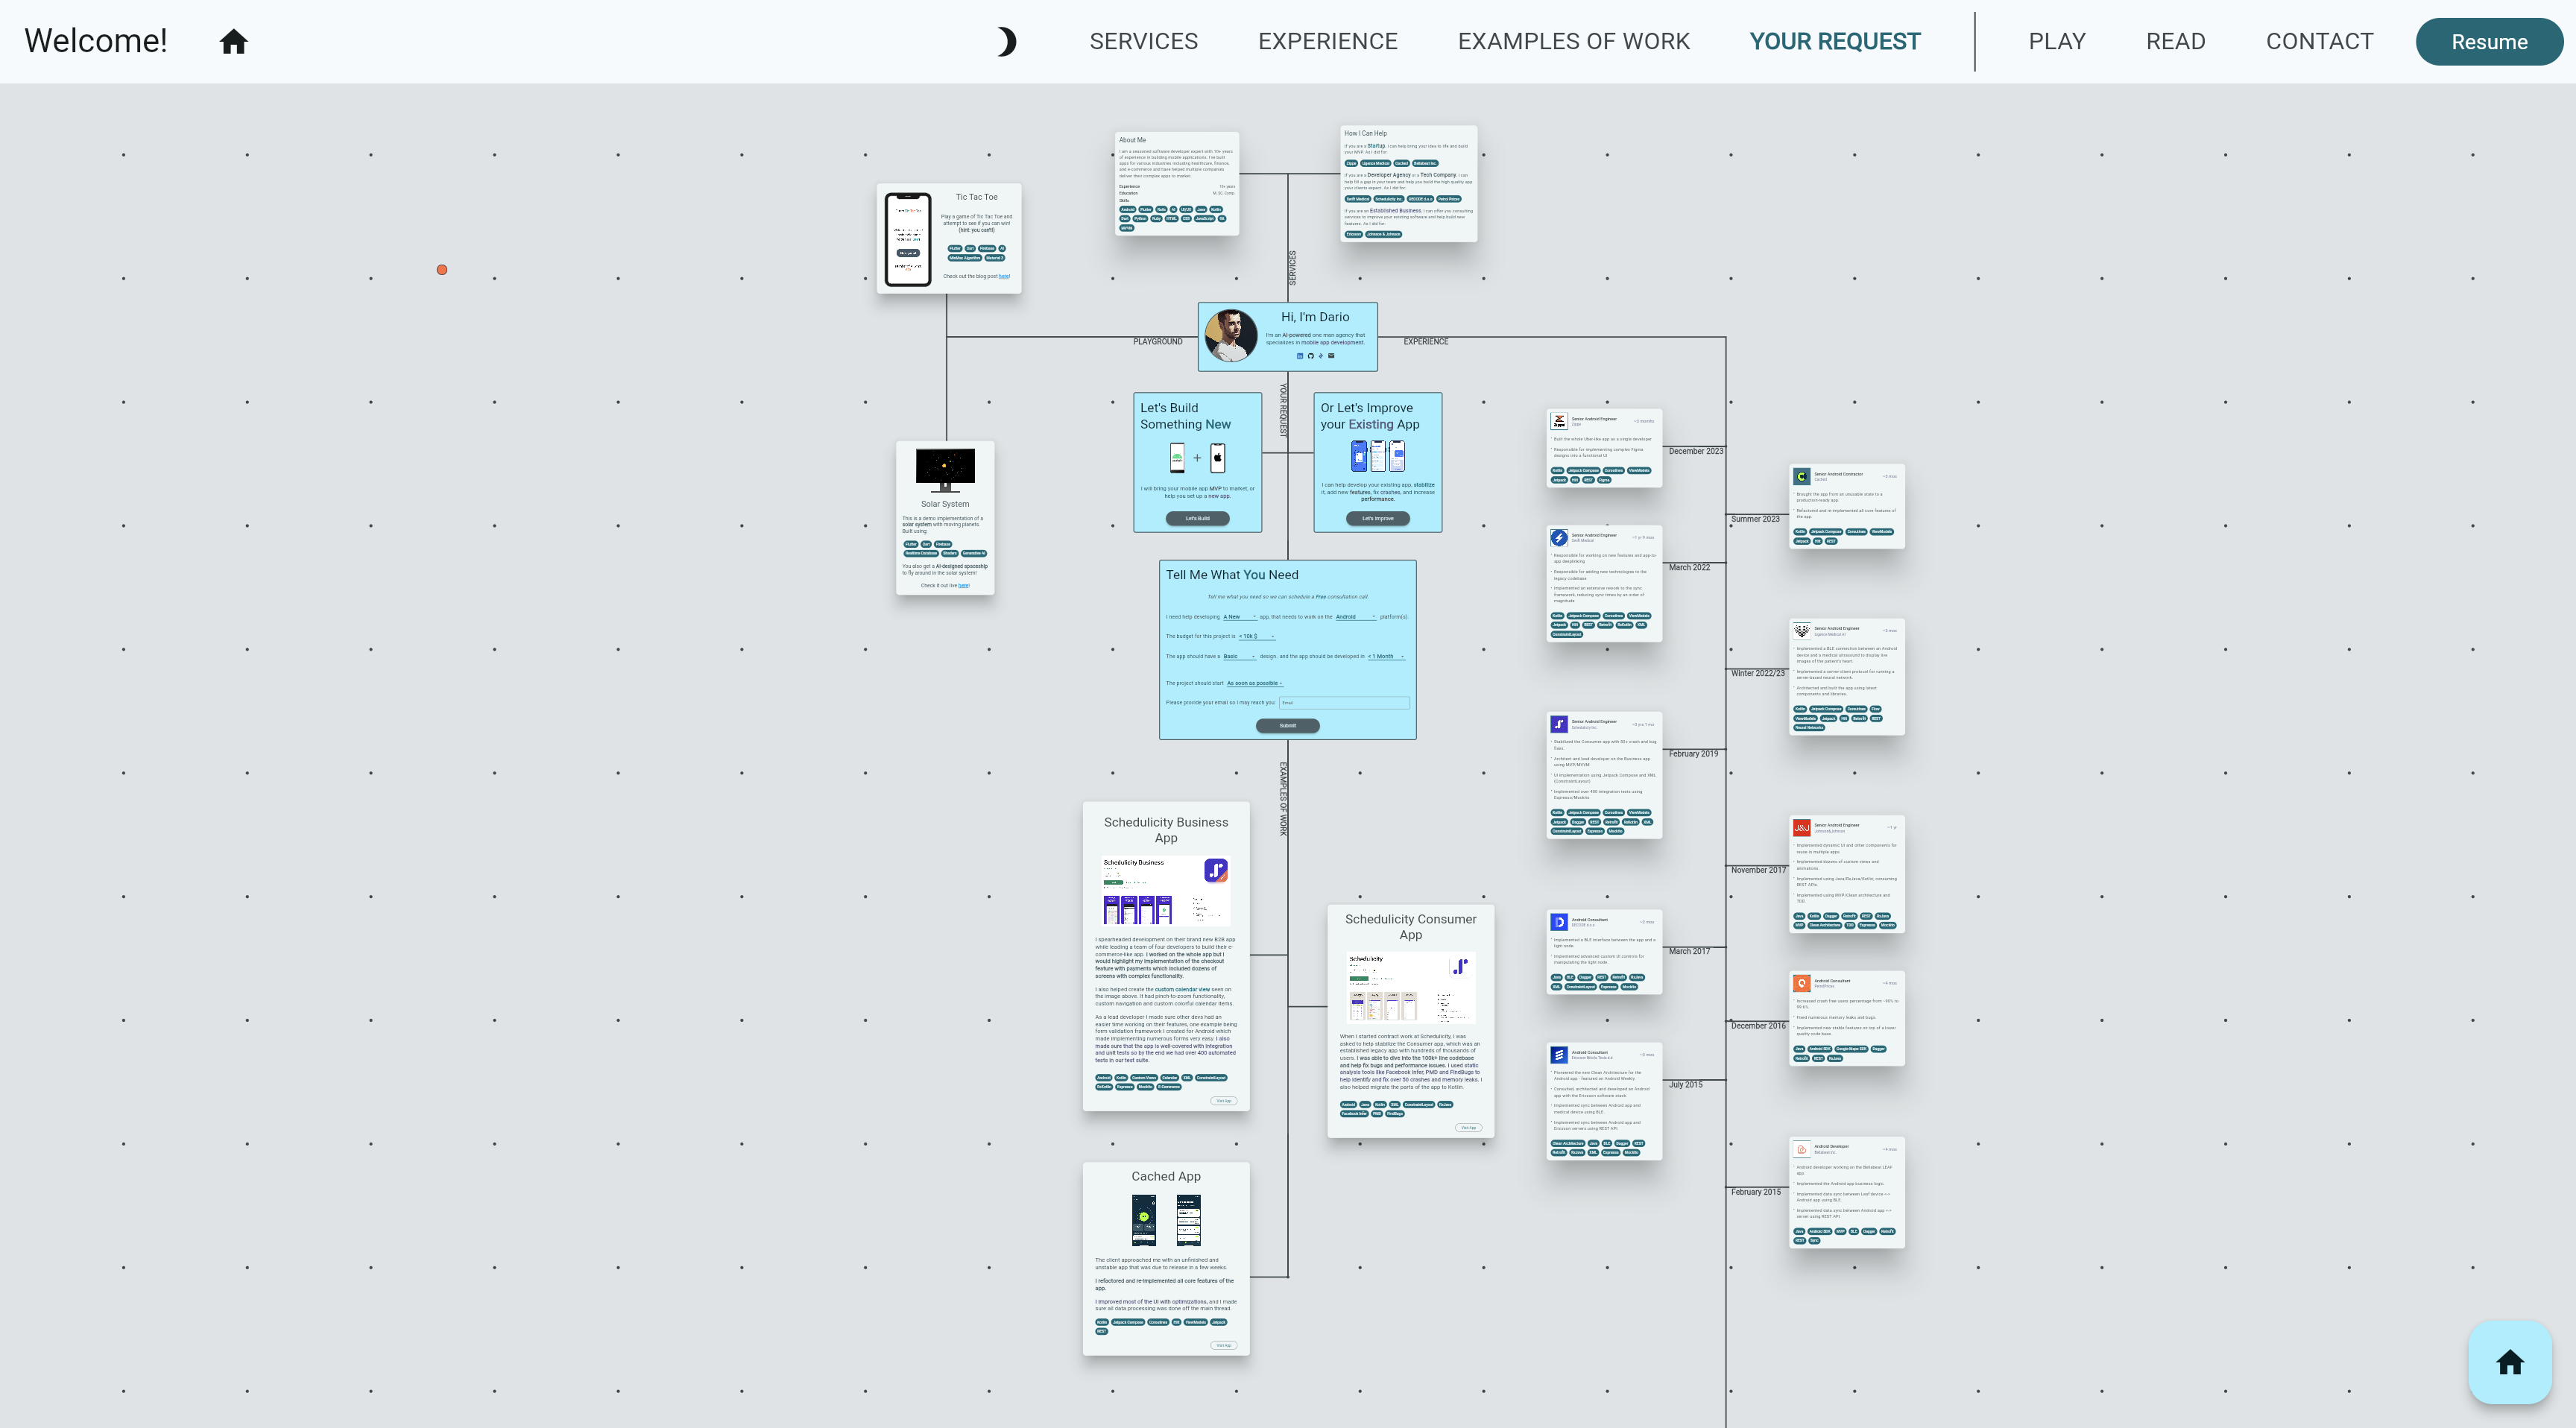
The canvas approach gives me room to place content anywhere on the screen so I decided to group certain content topics together. For example, there is a welcome section which is the first thing you see, the services and skill sections as seen in the image above, and there are also portfolio and experience sections to showcase my work. I decided to also add a playground section to add any other elements that I find fun or interesting.
To connect the content logically and to lead the user to certain sections, I decided to wire everything using painted lines. The painted lines are just Paint objects from one coordinate to another. In the following picture you can see all of the wiring for the content:
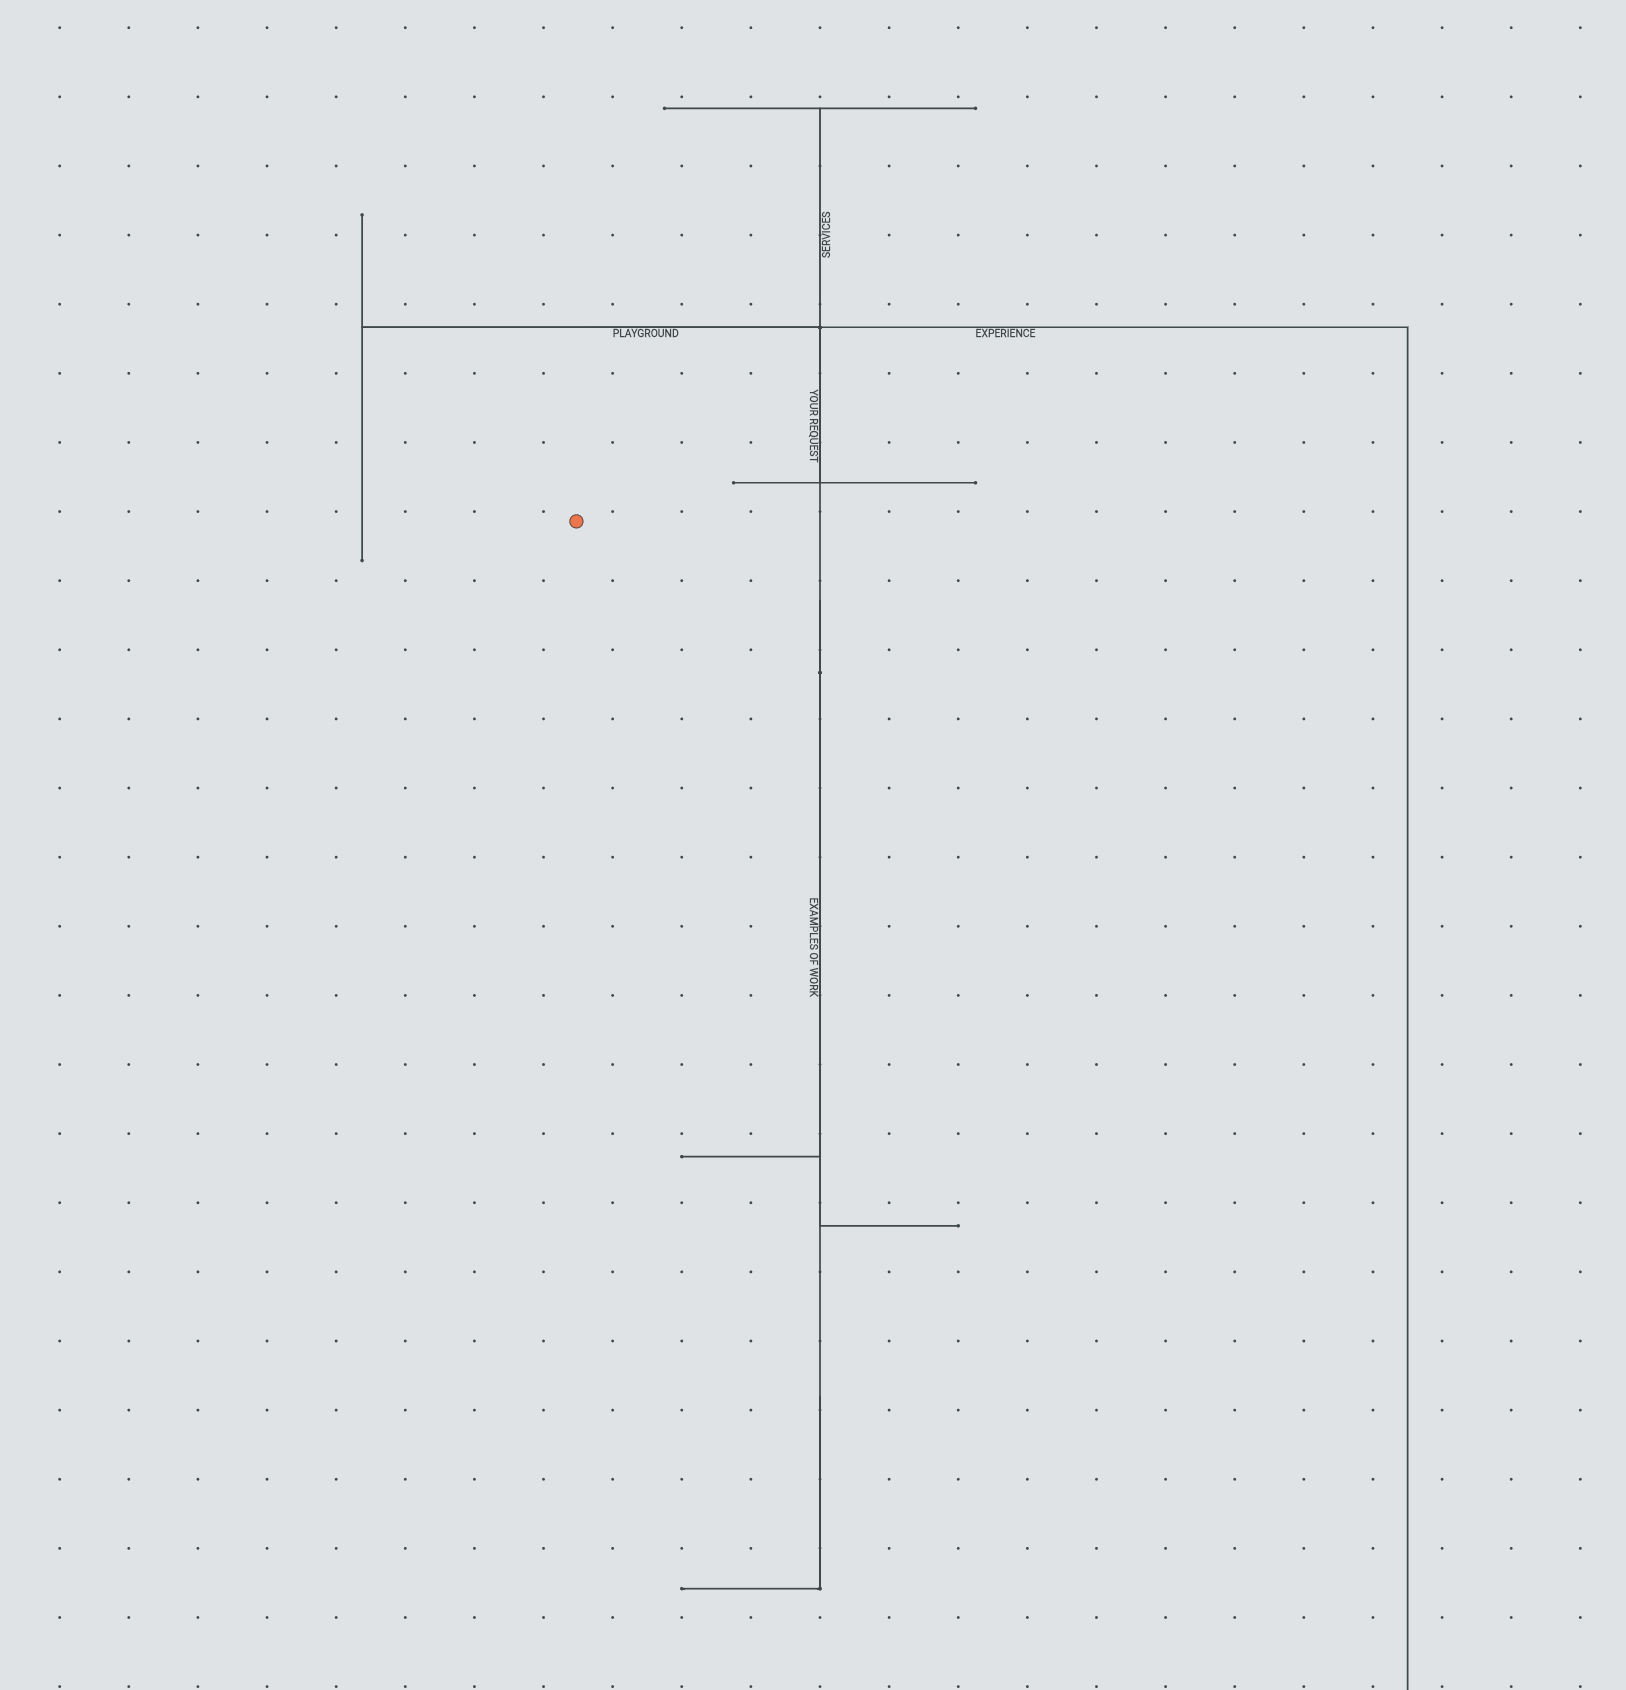
This means that I need to keep track of all the coordinates of all the widgets so the wiring is precise and the content does not overlap. This is not ideal but I found that it's not that much of a problem to manually align things in such a way as long as the coordinates are relative to the center of the page.
One of the more interesting sections is the playground section where I wanted to showcase interesting ideas or personal projects that I've had. One of those is a simple TicTacToe app, that you can play within the website, that I built a while ago with a small AI engine.
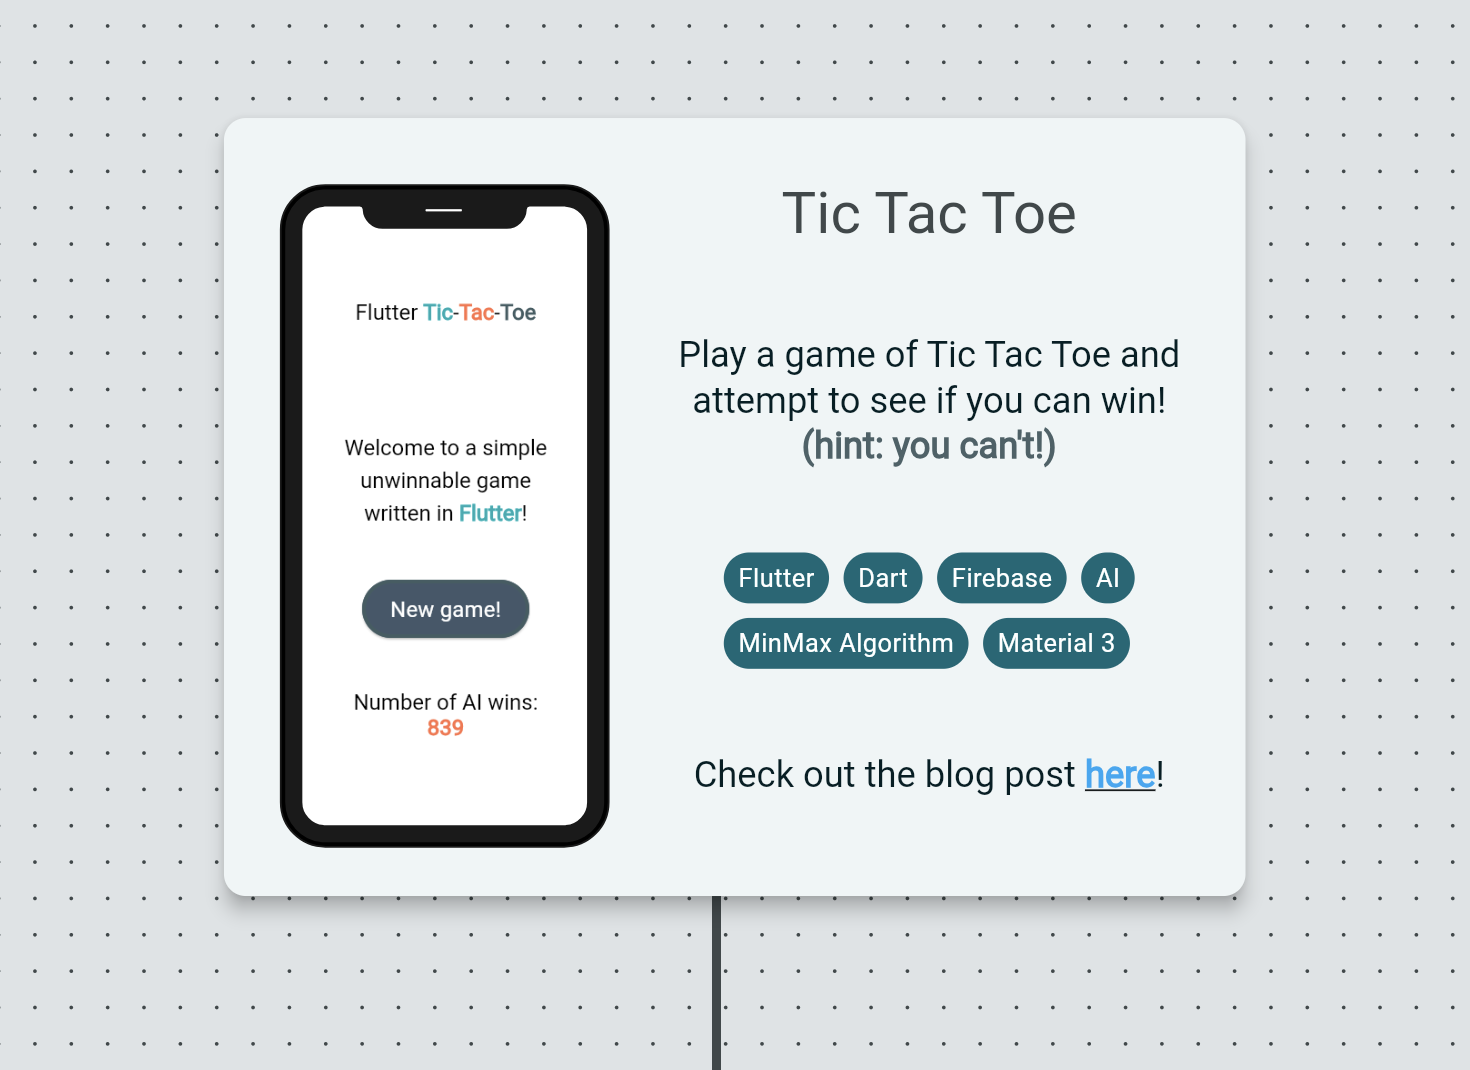
It's a Flutter app hosted on another Flutter app. It's actually hosted on Firebase and inserted on the website using a WebView.
You can also access it directly here, and the blog post about it here. It was designed for mobile screens so I put an image of a smartphone as a background to the WebView and made the dimensions fit as if you are on an emulator. I think the result is pretty cool and seamless.
I've mentioned there are other sections on the website but these are built using the same methods as described earlier, and adding all of it together resulted in the whole thing looking like this:
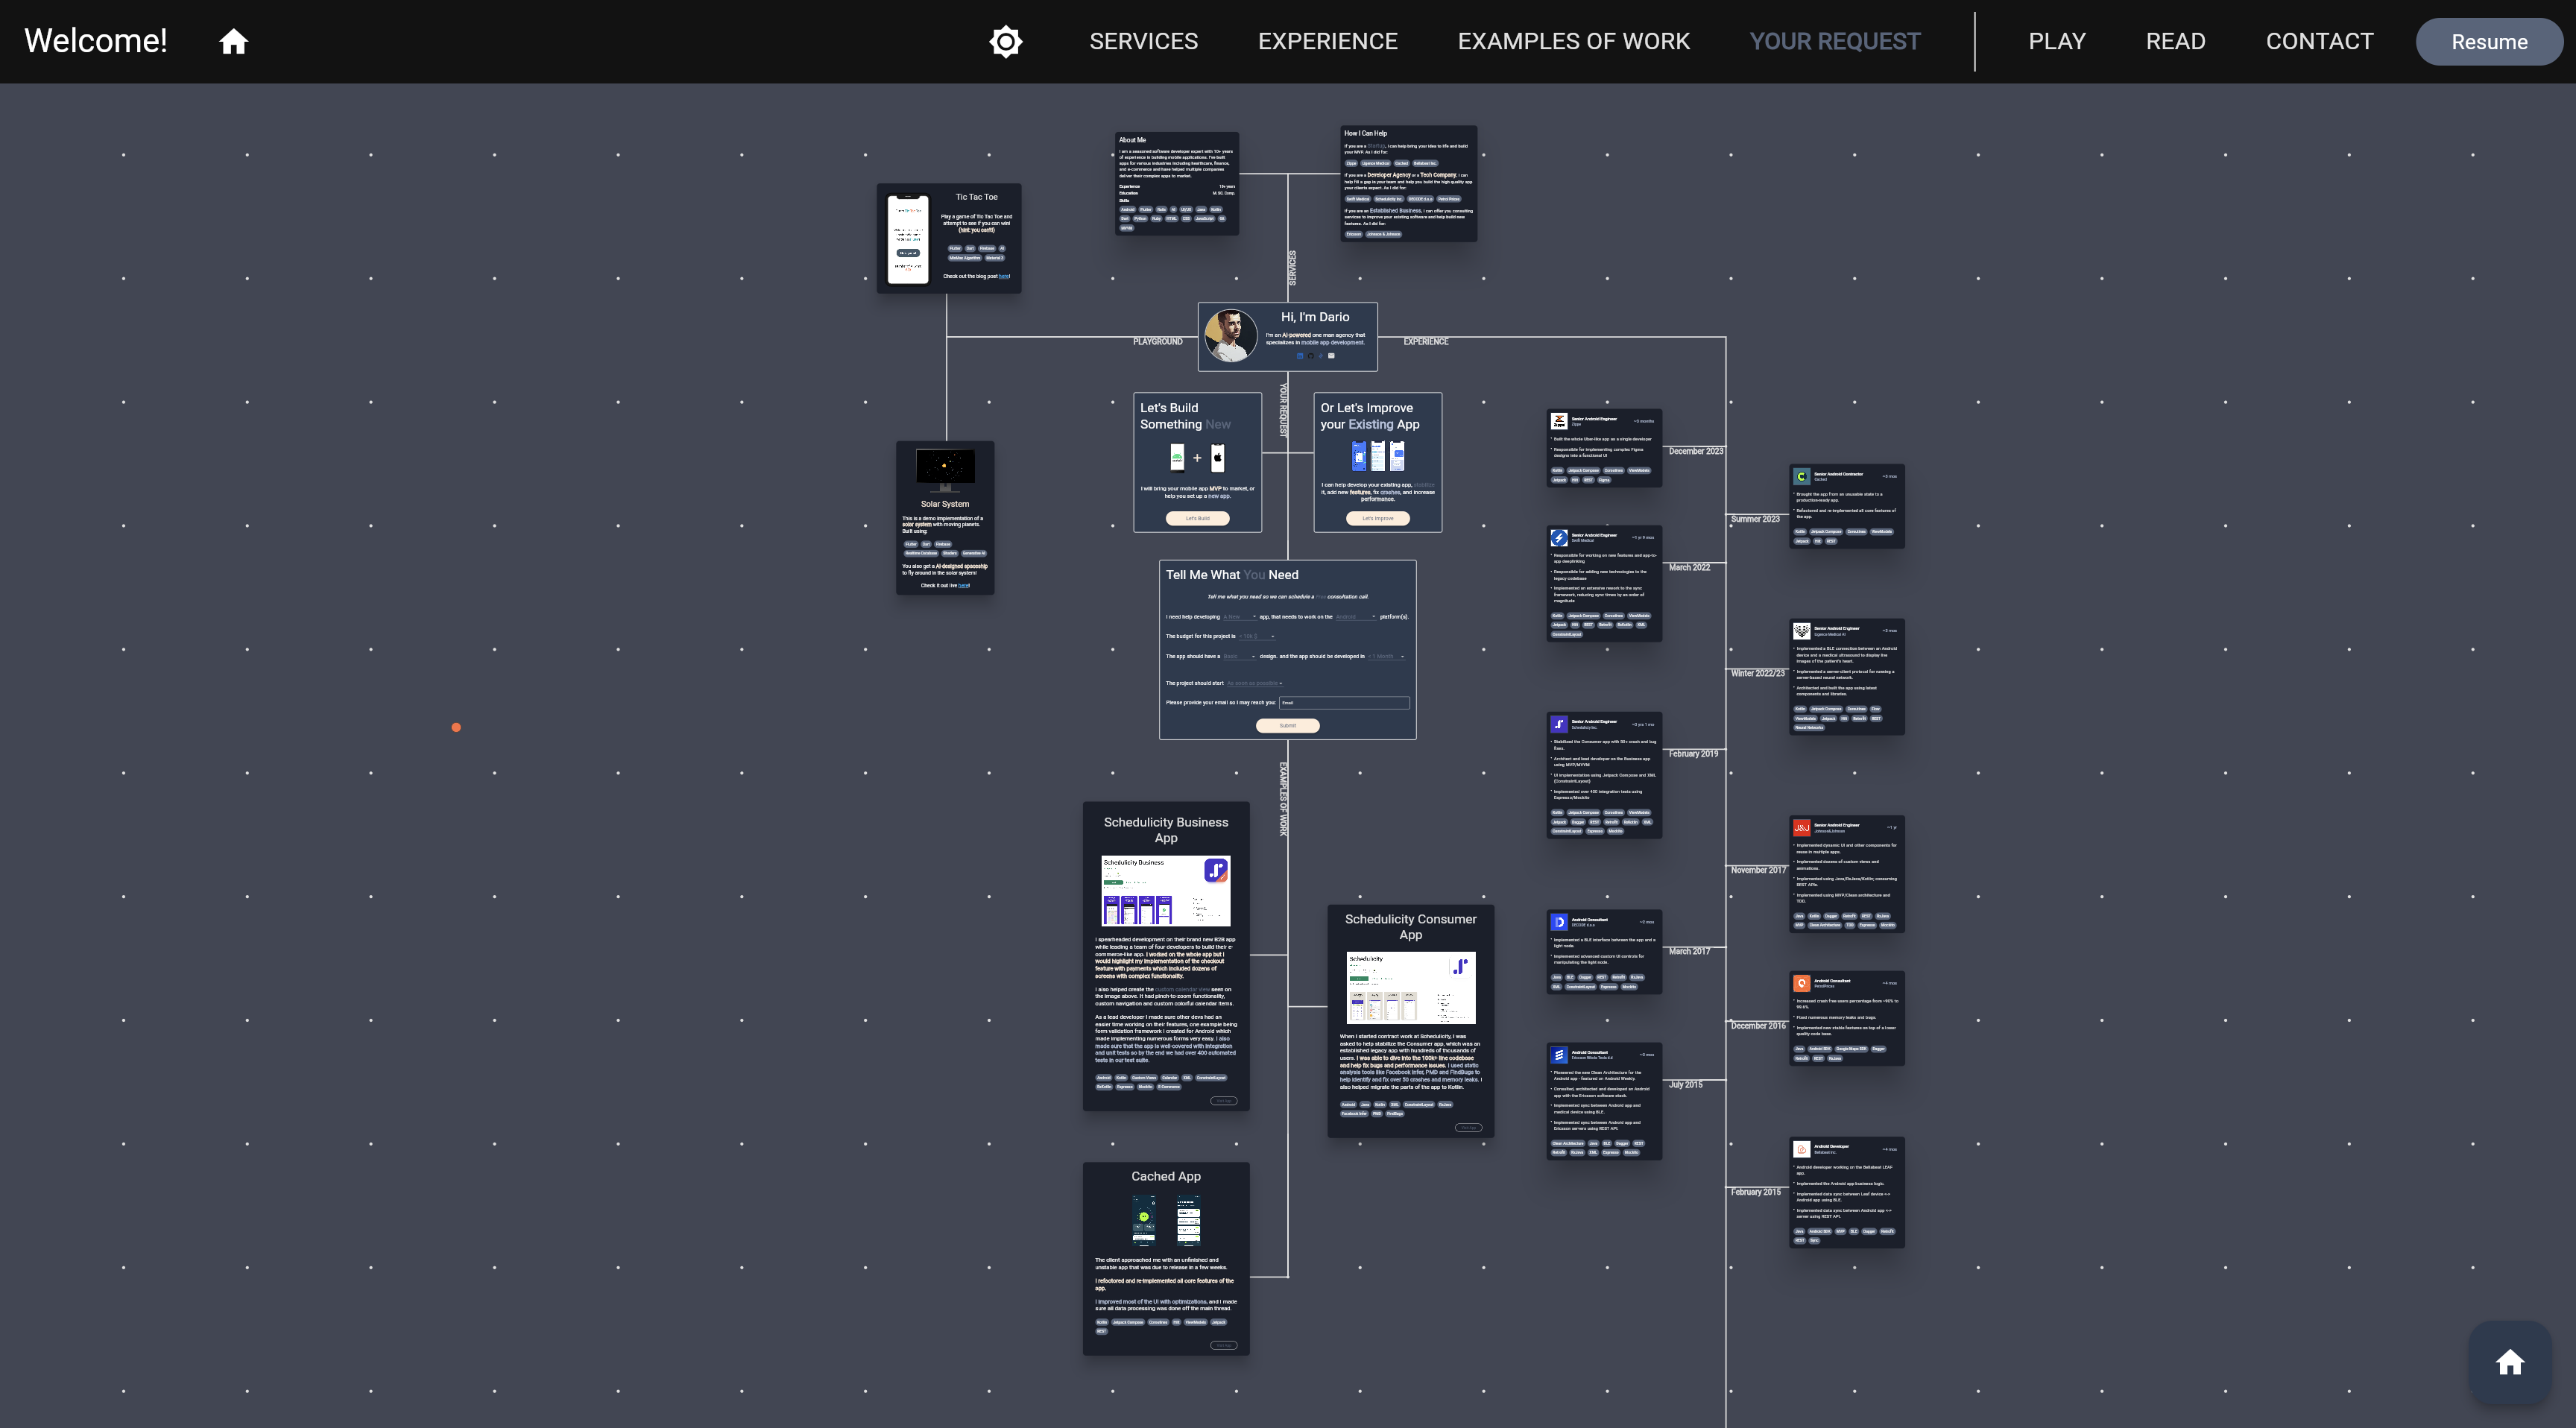
And of course, we have a dark mode option in the menu as well which I also experimented with until I got the colors to match:
I know, I know… things aren't aligned in the most precise way, and there are a few pixels of extra margins here and there but since the content will keep changing I will be adjusting that as I go, don't worry!
Cool things to add
I wanted to add a brief section about the ideas I had which are not yet realized but I think might be interesting to add.
Since we have an orange circle that represents your pointer, why not add pointers for simultaneous other site visitors? This is something that might make the canvas more alive and where you can check out what people are looking at.
I am thinking of using the Firebase Realtime Database to sync positions of all pointers on the site, and probably limiting those to a few dozen visitors, and simply showing a circle of different colors for each visitor.
One of the more obvious and trendy additions is an AI chatbot with which users can chat. I am thinking of giving it some pre-prompt instructions on what kind of services and prices I offer so the potential clients can almost immediately receive feedback on their potential project.
If you have any ideas to add to the canvas, feel free to let me know in the comments!
Mobile version
I mentioned performance issues in one of the earlier paragraphs regarding the background effect that I implemented. Because of these issues opening the website on a mobile device ended up being too CPU intensive, especially for older devices.
This is why I decided to build a whole new separate mobile version of the app which is more of a standard scrollable format. Even with this, I found that Flutter is having performance issues with scrolling when compiling for the web.
So, if you want the canvas experience then you need to open the website on a large enough screen, if not, then it will transition to a mobile-friendly version.
The distinction is done in the main.dart file:
final screenSize = MediaQuery.of(context).size;
bool isMobile = false;
if (screenSize.width < 1300) {
  isMobile = true;
}

Widget mainPage = isMobile
    ? MobilePage(onSwitchTheme: onSwitchTheme)
    : DesktopPage(
        title: 'Dario Milicic - Senior Mobile App Developer',
        onSwitchTheme: onSwitchTheme);
Problems I encountered
As I mentioned previously, performance is the main issue that I had in building this website. It's also an unconventional design for a Flutter app and a website so that is somewhat expected. It resulted in me spending a lot of time in optimizations and I still have more room to optimize and improve performance.
I especially had problems on lower-end desktop and mobile devices. This has forced me to work on a specific mobile version of the website which isn't ideal. But since it's normal for websites to have responsive design it's not uncommon having to implement things for mobile devices.
One of the major issues that Flutter has is that SEO is almost non-existent. Almost no content on my website is searchable by a search engine because it's drawn as pixels on a screen. The Flutter app itself is hosted on an HTML page so there is limited SEO you can do by setting the meta tags in the head, however, it's the bare minimum that you can do SEO-wise.
The official recommendation for now is to have a static HTML page in addition to the Flutter app if you want to enable SEO and be searchable by search engines, which I will get to in a minute.
The last issue I consider worthy of mentioning here is the long initial load times of the website. This required me to add a loading animation written in JavaScript until the Flutter engine loads. It's not ideal as some people will simply not wait for the app to load as they are used to fast-loading websites but it's something I have to be ok with.
So this is the first thing you will see when you open the website:
This was done in the index.html file and it's just a loader that I asked Copilot to create:
.loader {
  display: inline-block;
  position: relative;
  width: 120px;
  height: 120px;
}

.loader:after {
  content: " ";
  display: block;
  border-radius: 50%;
  width: 0;
  height: 0;
  margin: 8px;
  box-sizing: border-box;
  border: 64px solid #3498db;
  border-color: #3498db transparent #3498db transparent;
  animation: loader 1.2s infinite;
}

@keyframes loader {
  0% {
    transform: rotate(0deg);
  }
  100% {
    transform: rotate(360deg);
  }
}
Things to do in the Future
Flutter 3.22 has made Wasm available in the stable channel. This is an obvious way to improve the performance of the website, however, after playing around with it I realized there's a lot to migrate for it to work. I do think it will be worth it to run such an app on the GPU as opposed on the JavaScript runtime.
Why am I rewriting it?
I am not exactly rewriting it, but I will be adding a classical website that will have a more linear scrolling experience where I would list out projects and it will be similar to the mobile version. It is mostly for SEO reasons but also to learn a state-of-the-art web framework.
I still think that learning things outside your normal day-to-day is a great way to enhance your skills overall, which is even more relevant now that the market is in a weird state.
The canvas version will stay and still get updates whenever I think of a cool new feature.
Final thoughts
This experience was much more fun than I expected, and you don't notice how streamlined real-life development work is until you do hobby projects like that on the side. This allowed me to experiment and think outside the box a bit, and do away with the normal CRUD apps that I mostly get tasked with building.
Do I think Flutter Web is a great way to build websites? Yes and no. It should be considered if your requirements are such that you need a complex web app with state management, and especially if you already have Flutter expertise. It's also fairly easy to build complex UI with animations as you have control over every pixel.
Another huge advantage is the potential to have exactly the same codebase across Android, iOS, Web, and other platforms that you wish to support. If you are a smaller company or a startup, this has the potential to save you a lot of resources and time because you might not need three different teams to build your software. This is also why a lot of my clients use Flutter for their MVPs to quickly prototype and test their ideas. Flutter is a great tool for that.
However, if we are talking just about the web, it's still not behaving exactly like a website that the browsers expect, especially in terms of SEO. Plain old HTML and CSS still have an advantage in that area.
All in all, I will continue using Flutter for Web-based projects in the future in case the project requirements align well with its benefits. But we should all keep in mind that it's only just a tool as any other, and will excel in certain areas but not in others.
I hope this was an interesting read, and I can't wait to share more similar writeups in the future.
If there are any questions or there's something I didn't cover but I should have, feel free to let me know and I'll be happy to discuss those.
Thank you for reading!